Title: Building a Fun and Smart Home with a DIY Smart Doorbell Introduction: In the exciting world of electronics, there's nothing quite as thrilling as creating your very own smart home gadgets. Today, we'll embark on a journey to build a Smart Doorbell using simple and easily accessible equipment like the Arduino Uno, an IR proximity sensor, and a buzzer. This DIY project is not only a fantastic introduction to electronics but also a step towards transforming your home into a tech-savvy haven. So, gear up, young inventors, as we venture into the world of smart homes! Materials You'll Need: 1. Arduino Uno: The brain of our smart doorbell, capable of processing information and controlling the connected devices. 2. IR Proximity Sensor: A nifty gadget that detects the presence of objects in its vicinity. 3. Buzzer: This component will be the voice of our smart doorbell, alerting you when someone approaches. Step 1: Setting Up the Arduino Uno: Begin by connecting your Arduin...
lead acid accumulator charger circuit
introduction:
To charge a battery from an A.C source ,first you need a step down transformer, a rectifier and a voltage regulator to maintain a constant voltage . then it can be used to charge a battery.
if a D.C voltage source is available ,you only need a DC-DC voltage regulator , then give the volts to the battery
DC VOLTAGE -→→DC VOLTAGE REGULATOR -→→BATTERY
As seen in the DC voltage is given to the DC voltage regulator here we use LM317 which is a DC voltage regulator.The regulated DC out voltage is given to battery. There is also a trickle charge mode circuitry which will help to reduce the current when the battery is fully charged.
component of athe battery charger circuit
LM317: LM317 is voltage regulator invented by Robert C. Dobkin and Robert J. Widlar in 1970.the main function of this voltage regulator is to regulate the voltage and give the constant voltage without any noise disturbance; for example if we have 42v and we want only 10v so to get this output we will give 42v to a voltage regulator and uninterrupted 10v. For LM317 there is no maximum voltage unless the difference between the input and output voltage should not exceed maximum differential voltage. The maximum differential voltage is around 40V and also it give exceed output current of 1.5A for 1.2v to 37V .it has three pins input, output and adjustable pin. In the adjustable we can adjust the difference between the input and output voltages. Minimum voltage should be 18V which is given as input voltage to the regulator.
Lead Battery: Lead Battery is a rechargeable battery in the 1857 by gaston plante. The main advantages of Lead battery is it will dissipate very little energy (if energy dissipation is less it can work for long time with high efficiency),it has very low energy to weight ratio, it can deliver high current’s and very low cost.
Lead Acid Battery Charger Circuit Diagram:
The circuit diagram can be seen below:
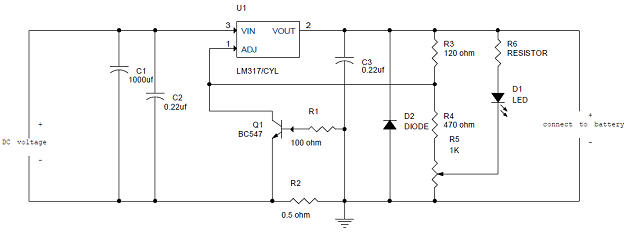
Circuit Explanation:
- The DC voltage is connected to the Vin of the LM317 in between we have connected the capacitors will be opened but if it had any AC noise it will remove it.
- The Vout of the LM317 is given to the battery which is to be charged, pin1Adjustment pin of the LM317 is connected to the transistor Q1, Resistor R1, R2, R5 which will help to adjust the regulator.
- The output of regulated voltage and current is controlled by the transistor Q1, resistor R1 and R2 and potentiometer R5.potentiometer which is used to set the charging current. Resistor R2 will have more current when the battery is getting charged. This will help to conduct the transistor Q1. The conduction of Q1 will help to adjust the voltage of LM317.
- TRICKLE CHARGE MODE: in this mode if the battery is charged the reverse current will flow. If the LED has glown then we can say that battery is charged. The diode D2 will protect the LM317 from the reverse current. When the battery is fully charged it will reduce the charge current. If the charge current the transistor will get off so the voltage regulator cannot be adjusted.
NOTE:
- The battery should be charged with 1/10th it’s charging current.so the voltage regulator must generate 1/10th of the charging current produced by the battery
- Heat sink should be attached to the LM317 to the get the better efficiency.
/strj].
ReplyDelete