
Building a Fun and Smart Home with a DIY Smart Doorbell

  Title: Building a Fun and Smart Home with a DIY Smart Doorbell Introduction: In the exciting world of electronics, there's nothing quite as thrilling as creating your very own smart home gadgets. Today, we'll embark on a journey to build a Smart Doorbell using simple and easily accessible equipment like the Arduino Uno, an IR proximity sensor, and a buzzer. This DIY project is not only a fantastic introduction to electronics but also a step towards transforming your home into a tech-savvy haven. So, gear up, young inventors, as we venture into the world of smart homes! Materials You'll Need: 1. Arduino Uno: The brain of our smart doorbell, capable of processing information and controlling the connected devices. 2. IR Proximity Sensor: A nifty gadget that detects the presence of objects in its vicinity. 3. Buzzer: This component will be the voice of our smart doorbell, alerting you when someone approaches. Step 1: Setting Up the Arduino Uno: Begin by connecting your Arduin...
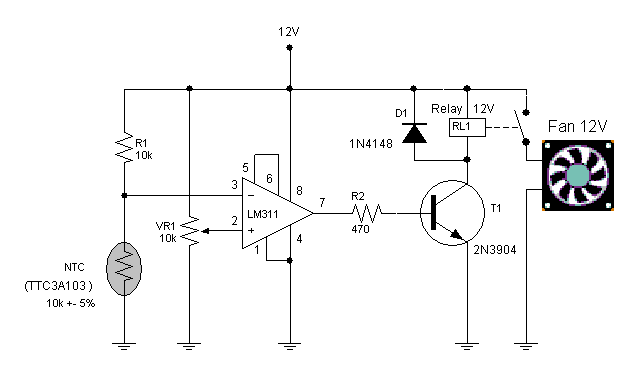
Automatic fan controller circuit( heat sensor [Thermistor])


Automatic Fan Controller Circuit


Automatic Fan Controller Circuit


This circuit will turn on/off 12V DC fan or CPU fan when temperature above normal temperature.You can set turn on temperature by adjust VR1. This circuit use an NTC (Negative temperature coefficient)which is a thermistor is one in which the zero-power resistance decreases with an increase in temperature. So If temperature increase the voltage at pin 3 on LM311 will decreased .The resistance of NTC is about 10K at 25'c.

VR1 should be multi-turn potentiometer type such 10K/25 turn


    Droid Electronics 

Comments

Popular posts from this blog

555 TIMER IC

       THE 555 TIMER IC      The 555Timer IC is the most popular IC , it is an IC most electronics hobbyist/ enthusiast encounter . it is commonly used to produce variety of waveform using few external RC network.    The 555Timer gets it name from the facts that there are three internally connected 5kohms resistors , which is used to generate the two  comparator reference voltages( although , the CMOS version uses three 100kohms resistors) . it is a cheap IC and it's used in precision timing device which can act as either a simple timer to generate single pulses or long time delays or as a relaxation oscillator producing a stablized waveform of varying duty cycles (ranging from 50% to 100%). The 555Timer is made up of 8 pins and it appears in a DIP package (Dual- in- line package). The IC can be operated either as  a Monostable , Bistable or Astable multivibrator to produce a variety of timing operations such as pulse gene...

Seaborn

Seaborn is a Python data visualization library built on the matplotlib library. (i.e., it runs matplotlib at the backend and so accepts some keyword argument used in matplotlib). seaborn is a dataset-oriented visualization library. Its plotting functions operate on data frames and arrays containing whole datasets and internally perform the necessary semantic mapping and statistical aggregation to produce informative plots. The Seaborn library aims at creating informative plots with fewer lines of code.  It also has the following features.   * Aesthetic styling and colour palette  * It is dataset oriented, i.e., works well for matrices, data frames, etc.  * It functions well with pandas and NumPy data structures  * Create statistical plots with fewer lines of code.   Getting Started   Install the Seaborn library into your Python environment. make sure you have matplotlib installed also since the seaborn library runs off the matplotlib lib...

Building a Fun and Smart Home with a DIY Smart Doorbell

  Title: Building a Fun and Smart Home with a DIY Smart Doorbell Introduction: In the exciting world of electronics, there's nothing quite as thrilling as creating your very own smart home gadgets. Today, we'll embark on a journey to build a Smart Doorbell using simple and easily accessible equipment like the Arduino Uno, an IR proximity sensor, and a buzzer. This DIY project is not only a fantastic introduction to electronics but also a step towards transforming your home into a tech-savvy haven. So, gear up, young inventors, as we venture into the world of smart homes! Materials You'll Need: 1. Arduino Uno: The brain of our smart doorbell, capable of processing information and controlling the connected devices. 2. IR Proximity Sensor: A nifty gadget that detects the presence of objects in its vicinity. 3. Buzzer: This component will be the voice of our smart doorbell, alerting you when someone approaches. Step 1: Setting Up the Arduino Uno: Begin by connecting your Arduin...